Seller’s Net Sheet Basic Instructions
Getting Started
1. Follow the Installation
Instructions to download the demo version of the Seller’s Net Sheet.
2. Double-Click the “Seller’s
Net Sheet” Icon on your desktop.
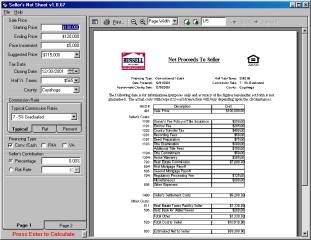
Sale Price
In the old MLS system, Net Sheets had to be printed one at a time. This application will create all the Net Sheets in one step. As an example, let’s assume the subject property should list for $115K and we want to create a range of Net Sheets from $100K to $120K on $5K increments (So we’ll have 5 sheets: $100K, $105K, $110K, $115K and $120K)
3. Enter a Starting Price of
$100,000 (you do not have to include $ signs or commas).
4. Enter an Ending Price of
$120,000
5. Enter a Price Increment of
$5,000
6. Optional: Select $115,000 in the
Suggested Price combo box.
Selecting a Suggested Price will add an additional
icon next to the selected dollar
amount. ![]()
Tip: To get just one Net Sheet, set both the Starting Price
and Ending Price to the same value.
Tax Data
7. Optional: Enter an estimated Closing
Date. This date will be used to
calculate the prorated tax amount.
8. Optional: Enter a half-year tax
value.
Tip: Clicking on the down arrow ![]() on the right side of a date field will pop up
a calendar tool.
on the right side of a date field will pop up
a calendar tool.
Tip: Clicking on the down arrow ![]() on the right side of a number field will pop
up a calculator tool.
on the right side of a number field will pop
up a calculator tool.
9. Select a County. This county selection will be used to
calculate Transfer tax values as well as Escrow Fees.
Commission Rate
10. Choose one of the three tab selections
a. Typical: Standard graduated and straight commission rates (IE 7-5%, 6-5%, 6-4%, etc.)
b. Flat: Single dollar amount that does not vary based on sale price.
c. Percent: Custom graduated or straight commission rate (IE 3 ½% on the first 100K, 2 ½% on the remainder).
Tip: The percent tab can be used to calculate the buyer’s agent commission if that is the only value known.
Financing Type
11.
Check
all of the financing types you would like to generate. In our example, there will be 5 Net Sheets
per financing type so if we chose all 3, we will have a total of 15 Net
Sheets.
Note: Some fields will vary based upon the financing
type. Some items like Escrow Fee, for
example, will double with VA financing.
Title agencies recommend $200 in miscellaneous charges for
Conventional/Cash, $300 for FHA and $400 for VA. If you select more than one financing type, the Miscellaneous
field will use these values.
Seller’s Contribution
12.
Optional: Select either Percentage (points) or a Flat Rate for
a single dollar amount.
13.
Optional: Enter a percent value or a dollar amount.
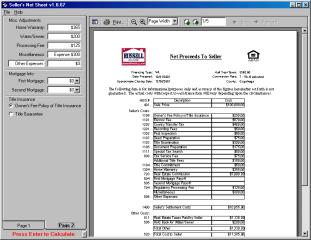 Misc.
Adjustments
Misc.
Adjustments
14.
Enter
a home warranty dollar amount (or $0 if the seller is not providing a home
warranty). Default is $365
15.
Enter
the dollar amount to be withheld for Water/Sewer (or $0 is the property has a
well). Please make sure to increase
this hold back for multi-family properties. Default is $200
16.
Enter
a processing fee. Default is $125
17.
Enter
Miscellaneous expenses
Note: This field will not be enabled if more than one
financing type has been selected.
18.
Enter
the name of any additional expenses or credits that may exist.
19.
Enter
the dollar amount of the expense or credit.
Note: Press the “-“ (minus sign) to make the value a credit. Red text is a credit and black is an
expense.
Mortgage Info
20.
Optional: Enter a dollar amount for the First Mortgage.
21.
Optional: Enter a dollar amount for the Second Mortgage.
Title Insurance
22.
Select
Seller’s Fee Policy of Title Insurance or Title Guarantee.
a. Seller’s Fee Policy of Title
Insurance is used by all of the large real estate companies.
b. Title Guarantee is more
expensive for the seller and provides less protection. Few companies still use this type of
insurance.
Viewing the Pages
23.
To
see how many Net Sheets have been created, ![]() look at the top right of the Net Sheet quick
view for these icons:
look at the top right of the Net Sheet quick
view for these icons:
24. Use the icon with the Up arrow to go up one page and the down arrow to go down one page. In this example, we are on page #2 of 15.
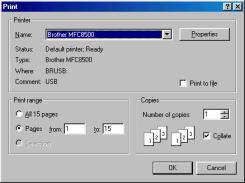 Printing
25.
Click
the Print Icon ![]() in the quick view area.
in the quick view area.
26.
Select
the printer you would like to use.
27.
Click
the Properties if you would like to change the color or print quality options
of your printer.
28.
Chose
All Pages or individual pages to print
29.
Click
OK.